Showing posts with label chair. Show all posts

Saturday, February 1, 2014

My Chair was Featured at One Kings Lane!


I'm so excited that One Kings Lane has featured my $2 chair transformation! 
 
Here's my original post: 


Check this out!

Garage Sale Visionary


Meet the Bloggers Who Inspired Us!
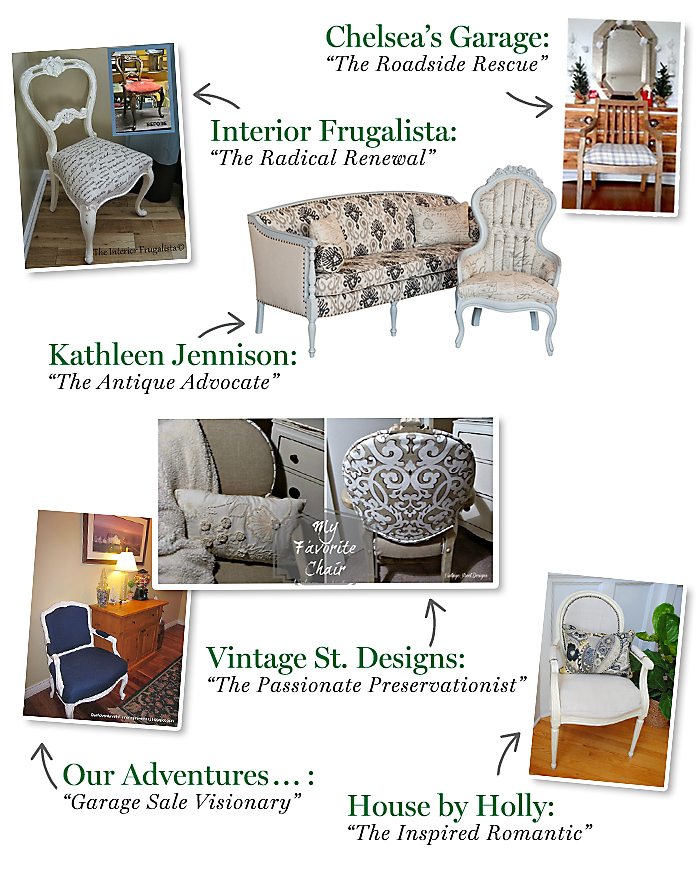
There’s more to DIY than the ‘D’ and the ‘I’—and these brave bloggers showed us a thing or two about tackling tough projects. In sharing their favorite statement chairs, each of the following ladies proved that, with a little love (and elbow grease), any chair can go from drab to fab!
And the awards go to…
Chelsea, of Chelsea’s Garage, found this pretty country-style spin on a classic Sheraton chair sitting by the side of the road. With freshly upholstered interchangeable seat cushions, she turned it into this sweet little multitasker—a true “Roadside Rescue.”
Marie, of Interior Frugalista, went in for a quick refresh, but quickly realized this Victorian buckle-back chair was going to be a lot more work. After removing its original straw stuffing and adding new upholstery and a fresh finish, she accomplished what we can only call a “Radical Renewal.”
Interior design pro Kathleen Jennison has the art of transforming antique chairs into modern creations down to a science, and we love her vision! Her roster of statement chairs—all reupholstered with her magic touch—gives her the honor of “Antique Advocate” in our book.
We love how Judy, of Vintage Street Designs, knew the vibe she wanted for this French-inspired Colonial revival chair, and brought it to life. Her total transformation infuses a dose of Parisian elegance and French country charm to her “Inspired Romantic” DIY.
Holly, of House by Holly, found this Louis XVI seat on a curb, and defied the odds to bring it back to its former glory! We’ve dubbed her a “Passionate Preservationist” for her ability to see the potential of this regal seat.
Pam, of Our Adventures in Home Improvement, is a true “Garage Sale Visionary.” The heart and soul of this DIY was giving this tired Louis XV fauteuil a new lease on life—and we applaud her tireless efforts, and amazing results!

 
Thank you so much to One Kings Lane and thank you for your visit.


Pam

Saturday, November 16, 2013

My Statement Chair


Do you have a favorite chair?  Does it make a statement about your style?  I have this one!   A couple of years ago I came across this beauty at a garage sale.  It was $2.  My husband was sure I had lost my mind, as it was pretty nasty looking.  But I had a vision for it. 


Luckily we worked and worked on removing the thousands of staples and all of the old yucky fabric, then we started over.  It cost $35 in new fabric, padding and cording. 


This week I was asked to show my Statement Chair and let others know about the Home Décor Resource at One Kings Lane.  They have a ton of information on furniture!  There are details on different styles, different periods, etc.
 
On their site, I learned that my chair is based on a 19th Century French design. 
 
(They have this beauty for sale through 11/17/13.)
 
 
It's been a couple of years since reupholstering this chair and I still love it!  It's definitely my Statement Chair.


Thank you for your visit! 
 
Pam
 
 
I am linking to the following parties:
 
 
Inspire Me Tuesday at A Stroll Thru Life
 
Dwellings-The Heart of Your Home


DIY Show Off

Sunday, February 19, 2012

Living Room Transformation

Our new couch was delivered yesterday.  I am so excited to work on the living room.  It is attached to the kitchen, so it is used a lot!

(I have to find something to put on the big empty spot on the wall.)


I love that there is now lots of seating.  


I love these pillows.  I saw them in the Sundance catalog and they were way out of my price range.  I was in the Sundance outlet a few years ago and there they were! 


 I was able to find a place for my 'new' chair.


  The end table that we redid this summer fits nicely between the two club chairs. 


I like the little bird here that I bought on our recent trip to Chicago.


 I have to keep my apothecary jars in a spot where the cat can't constantly get near them. 


Thanks for coming by!

Pam


I am linking to the following parties:


The DIY Show Off UndertheTableandDreaming

Saturday, January 21, 2012

$2 Chair Transformation


 In November I was at a garage sale and found a chair for $2.  I was really excited about it, as it had so much potential.  My husband was mortified that I'd bring something that disgusting home.  (for the record, it was very, very worn, but not as disgusting as it could have been; however, it was not allowed in the house)  :)


 We started by removing all of the cording. 


 The filling was pretty awful.  We probably should've worn masks...  This particular part wasn't too bad.


 My husband spent hours removing hundreds and hundreds of staples.  They were spaced out about every millimeter and were in a groove, so it was very hard to remove them.  He eventually used a Dremel tool to clean out the grooves.  At this point, it was ready for paint.


 Several coats of white paint had it looking much better.


 We kept all of the old pieces of fabric in case we needed the patterns for the new pieces.  This is from the arm (yes, very nice old fabric--I'm sure you're wondering why we didn't use it!)


We did the arms first. 


We then started stapling the fabric to the back.  We got this far and decided that it needed to be ironed.  Ironing right there was our only option.  (this picture is pre-ironed)


I used an electric knife to cut the foam and stuck it in the back.  I used 2" foam from Hobby Lobby and it seemed to fit well.


 For the seat, I used 3" foam.  I also wrapped some batting around it.


 I decided that cutting the exact pattern from the old fabric wasn't great for this part as I needed some extra to allow enough fabric to staple into the groove.  This was before I did any cutting on this piece!


This was prior to gluing on the cording.  The hardest part of this was cutting the edges of the stapled fabric that were hanging out of the groove.  I used little tiny scissors and carefully cut it so it wouldn't be seen once the cording was glued in there.


 I'm sorry that I didn't get a picture of the next step.  It was gluing the cording into the grooves.  We used a hot glue gun and stuffed the cord in.  At the ends of the cord, we used a lighter to glob it together so it would cut without fraying.  Luckily it did not catch us on fire and it did firm up the cord quite well.


 I haven't quite figured out where to put it yet.  Here it is by the front door without a pillow.
  

 And with a pillow....


 Here it is in our bedroom, where it will probably stay.


So now my husband is impressed.  He had been telling me that I was crazy to have bought the chair thinking we could redo it.  (I figured we could, and if not, we were out $2!)  I think it turned out beautifully!  With the fabric, foam, and batting, I have about $35 in it.  


Thank you for coming by!  I really appreciate your visits and comments.   

Don't forget to enter my Giveaway    
HERE


Pam


I am linking to the following parties:

 
Potpourri Friday at 2805


Fine Craft Guild
Home Stories A2Z

Miss Mustard Seed's Creative Blog